
Displaying stylish and eye-catching WordPress opt-in forms on your website is an effective way to get more email subscribers and grow your following. However, many of the opt-in form solutions currently available are premium tools, with high price tags that may not be affordable for many blogs and smaller businesses.
👉 In this article, you’ll learn how to create WordPress opt-in forms using a totally free plugin called Optin Forms. By the end, you’ll know…
- Why you can still build great-looking WordPress opt-in forms with a free plugin
- How to sign up with a free email marketing service so that you have a safe place to store your subscribers
- How to customize your forms and display them on your site
Why the Optin Forms plugin makes a good free option
👉 Beyond its free price tag, we like Optin Forms because:
- It includes six pre-built form designs, so you can create a good-looking form without any special knowledge.
- You can still customize your form’s appearance, including different text, colors, fonts, etc.
- You can connect to lots of different email marketing services, including a service called MailChimp, which has a free plan to get started.
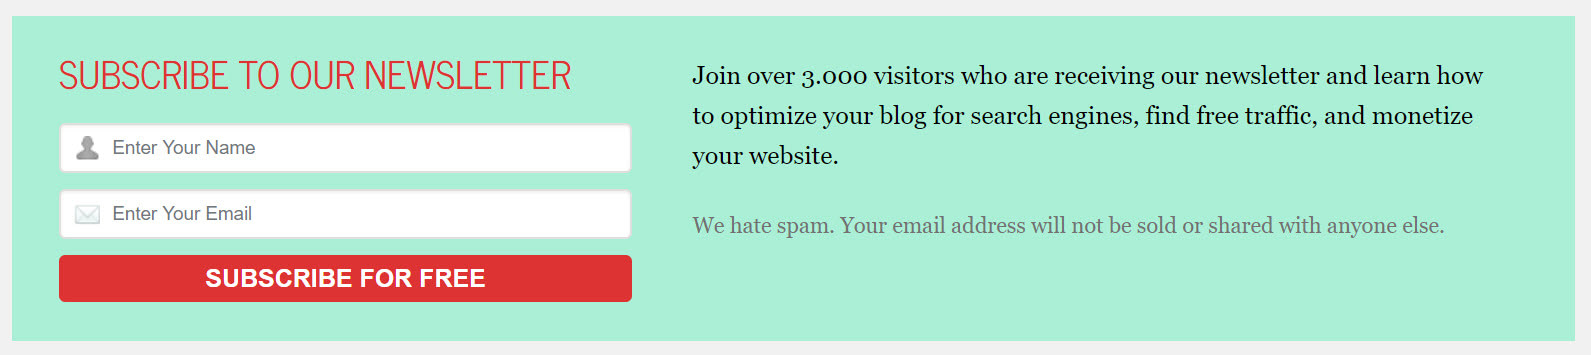
Here’s an example of a form that you can create with Optin Forms…
📧 You can integrate Optin Forms with the following email solutions…
- MailChimp
- AWeber
- iContact
- GetResponse
- MadMimi
- Interspire Email Marketer
- ConvertKit
As you can see, for a free solution, this plugin has impressive functionality. To get started with this tutorial, install the plugin at your site – our how to install a plugin guide can provide some help if needed.
Step 1: Sign up with an email provider (we recommend MailChimp) 🤝
Before you can set up Optin Forms on your WordPress website, you will need to sign up with an email provider. While Optin Forms supports several different services, we recommend MailChimp because it’s:
- 100% free for up to 500 email subscribers with a 1,000 monthly emails cap
- Easy to use, especially for beginners
To sign up with MailChimp, head to the MailChimp website and click the Start for free today link at the top of the screen.

Then, complete the necessary information – email, username, and password.

MailChimp will send you an email so you can authorize and activate your account. MailChimp will then collect some details about you and your business. You will need to provide an address, and here you can also connect your new MailChimp account to your Facebook and Twitter accounts if desired.
Once you finish setting up your MailChimp account, you’ll need to integrate it with the Optin Forms plugin.
Step 2: Integrate MailChimp with Optin Forms ⚙️
After you have installed the plugin on your WordPress website, select Optin Forms from the menu on your WordPress dashboard. The first step to configuring Optin Forms is to connect with your email provider. Therefore, under the Email Solution tab, select MailChimp from the drop-down menu.

You will now need to provide the Form Action URL. To find this information, switch back to your MailChimp account. Click on Lists from the menu bar at the top of the page.
You can then either create a new list specifically for your new mailing list or use the default one that has been created when you set up the account. This list is where your website visitors’ email addresses and personal information will be stored once people have signed up to your email list.

Once you have selected the list you want to use, select Signup Forms from the chosen list’s drop-down settings menu (see image above). Then select Embedded Forms.

Next, click on the Naked form tab.

Scroll down the page to the HTML box. In this box, you will find the Form Action URL. Copy and paste this URL (not the entire code – just the highlighted example below) into the Form Action URL field in your WordPress dashboard.

Make sure you remember to click on Save Changes at the bottom of the page.
Step 3: Configure the Optin Forms plugin 🖱️
The next step in the process is to choose and customize the opt-in form you would like to use. Click on the Form tab and then scroll through the form designs for the best fit with your site’s design.

Once you have selected your form design, scroll down the page. There you will find the customization options grouped in four distinct categories…
- Style Your Form
- Form Options
- Form Functionality
- Placement
Let’s take a look at each one in turn… 🔍
Style your form

These options will enable you to change the appearance of the form. Here are just a few of the customization opportunities that this plugin provides…
- Change the background and button color.
- Write a new title, text, button labels, and field inlay.
- Change all font types, sizes, and colors.
- Alter the width of the form.
Alterations will happen in real time to the form at the top of the page, enabling you to see what design changes work, and which ones don’t.
Form options

Under Form Options, you can choose to hide or display the different form elements. You can also choose to override the plugin’s CSS values by adding your own custom CSS if you so wish.
Form functionality

Here, you can opt to instruct the plugin to open the form submission in a new window. This is recommended to stop the submission form from taking visitors away from your site.
Form placement

The Form Placement options allow you to select where you would like the opt-in forms displayed on your website. You can choose to add forms to posts, custom post types, and/or pages. You can also exclude specific posts and pages, or disable this automatic service.
If you would rather manually embed your opt-in forms throughout your site, you can do so using the provided shortcode. Simply copy the shortcode from the box and then paste it into the correct position in the WordPress editor on the appropriate pages and posts.
Again, when you are happy with the customizations you have made to your new form, don’t forget to select Save Changes at the bottom of the page. Your form is now complete and should be displayed on your WordPress website. Go ahead and test it to check it is working and MailChimp is receiving your new subscribers’ emails.
Final thoughts on how to create WordPress opt-in forms 🏁
Collecting email addresses is an important factor in growing your audience. However, once you have added WordPress opt-in forms to your website, your work isn’t over yet.
You now need to log back into MailChimp and create a dynamic email drip campaign, one that will welcome your new subscribers to your mailing list, remind them of your content, and consequently encourage them back to your website.
Have any other questions about how to create WordPress opt-in forms with Optin Forms? Please ask in the comments below…