
WordPress user roles and permissions offer access controls and privileges for your WordPress website. From Super Admin to Subscriber, every WordPress user who logs in to your website has a specific set of permissions or capabilities assigned.
But how familiar are you with WordPress user roles, what each of them means, and why it’s so important that you use each of them the correct way? If you don’t yet have a full grasp on user roles within the WordPress platform, you’re not alone. Many WordPress site owners don’t take full advantage of the power of WordPress user roles and permissions while managing their sites.
In this guide, we’ll cover everything you need to know for understanding WordPress user roles and permissions. Let’s take a deeper look.
What Are WordPress User Roles?
WordPress user roles define the level of access and capabilities that a user can utilize to log in, view, edit or manage a WordPress site.
A capability is a specific function or a set of actions that a user is permitted to complete. Each WordPress user role is clearly defined, so there are no misunderstandings about the things each user role can access and the tasks they can perform.
Within WordPress, you’ll see that there are six WordPress user roles that you can select from for each new user you add to your website. The user role you choose for each individual user depends on the level of permission and access you want them to have on your site.
For example, a WordPress user role defines capabilities such as:
- Who can manage comments
- Who can write blog posts
- Who can add pages
- Who can install or update plugins or themes
- Who’s allowed to add new users
- Which team members can delete spam
While you may have ignored WordPress user roles and permissions up until now, the truth is that understanding each role is essential, no matter if you’re in charge of a corporate website, news magazine, or running a personal blog.

The 6 WordPress User Roles
The six main WordPress user roles available in WordPress are:
- Super Administrator (for WordPress multisite networks)
- Administrator
- Editor
- Author
- Contributor
- Subscriber
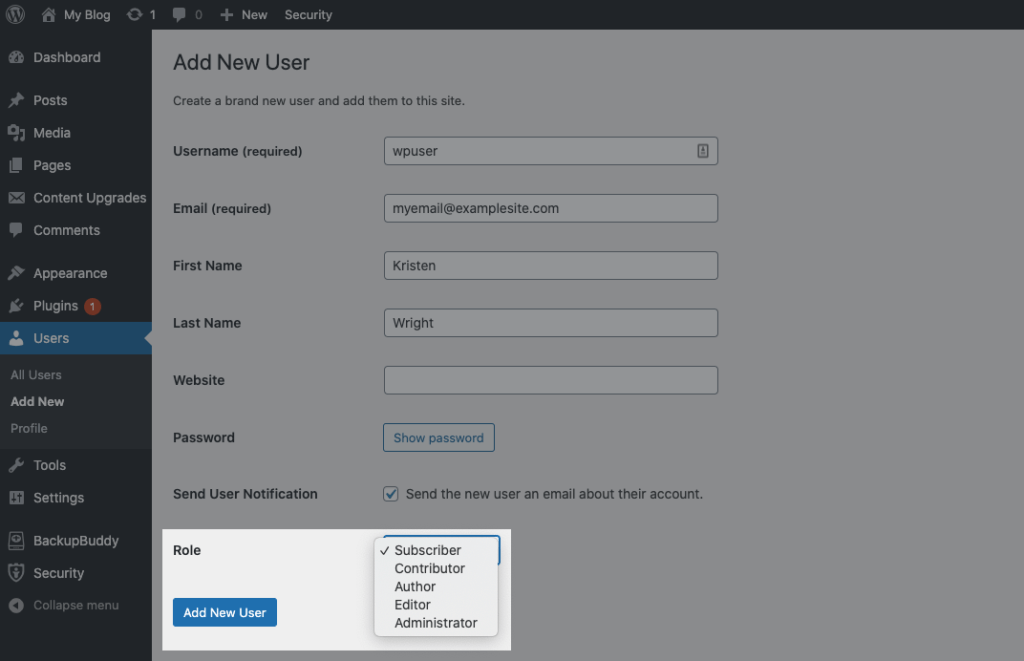
When adding a new user in WordPress, you’ll see the role options listed in a drop-down menu.
Before we go any further, let’s look at each one of them in detail.
1. Super Administrator
This Super Administrator role in WordPress is reserved for WordPress multisite networks. Individuals that are assigned as Super Administrator role have full responsibilities for all sites within the network and can manage all site features within each site.
Super Administrators have the power to delete other users (even Administrators), so it’s important to only assign this role to team members that you really trust. A Super Administrator can impact (negatively or positively) many parts of your business, including your network and the other users that run your site.
A WordPress Super Admin can also create new websites, manage themes and plugins across the multisite network, add, manage or delete content on every site. The Super Administrator controls the network with all settings and security issues. The first user setting up the multisite network is the default Super Admin.
Just note that WordPress multisite networks are one of the most advanced ways of using WordPress as a content management system. If you don’t have a multi-site network, you won’t need to use the Super Administrator role for any of your users.
WordPress Super Admin User Role Tips
- Within a WordPress multisite network, keep the organization of your user roles simple. A single user with just a couple of sites only needs the default Super Admin. As the organization grows, create meaningful user roles for employees.
- There are many ways to configure a WordPress multisite network and its users. If you are an agency or freelancer with multiple sites, assign each client the Administrator or Editor role for a specific site.
- Concentrate on WordPress user security checks from the first login. WordPress is a favorite target for experienced hackers, and sophistication is growing in the world of malware and virus attacks. Browser fingerprinting is also a rising threat to privacy.
- Control network-wide settings with caution. Plan the new user registrations and welcome emails with care.
2. Administrator
In a single WordPress installation, the Administrator user role has full access to every feature within the site. For most site owners, the WordPress Administrator role is the most significant user role in WordPress.
The site Administrator role is almost always assigned to the website owner and/or the main developer and has access to all of the WordPress features, settings and options. For all intents and purposes, the Administrator is King and Chief of your WordPress site. That’s why having a good handle on the responsibilities of being a WordPress admin is a good idea.
The WordPress administrator role has full access to add and edit posts and pages, change or update site settings, add and install themes and plugins, and much more.
The WordPress Administrator role can also update WordPress along with any plugins and themes installed on the site. The WordPress update process is an area that needs to be approached with caution; a single mistake can take down the site.
The Administrator is also in charge of assigning user roles and permissions to other users. The Administrator user role can modify users and their permissions which is another function to handle with care.
Administrator Capabilities Explained
- Site-Wide: Update WordPress core files, manage all settings, manage HTML and JavaScript code for all users
- Plugins: install, edit, and delete
- Themes: install and switch, edit widgets and menus, access the customizer
- Users: create, edit, and remove
- Posts and Pages: add new, publish, manage taxonomies
Administrator User Tips
- Limit the number of users given the Administrator user role. Ideally, there should only be one user who controls the WordPress installation.
- Your WordPress security begins and ends with the WordPress Administrator user role. Since WordPress administrators have full access to all things on the site, a WordPress admin needs a very secure WordPress login. This means using a strong password, two-factor authentication or even a passwordless login feature provided by a WordPress security plugin like iThemes Security Pro.
- WordPress admins must keep WordPress core files updated and secure. Administrators are also responsible for keeping plugins and themes updated, an important part of successful WordPress maintenance.
Get the bonus content: The Ultimate WordPress Maintenance Checklist
3. Editor
The Editor user role in WordPress is responsible for managing and creating content for your WordPress site. An Editor can create, delete and edit any site content including content that was produced by other users with permissions equal to or lower than Editor.
Editor users manage all site edits and approve/schedule content submitted by Contributors and Authors. However, an Editor doesn’t have any access to things such as plugins, widgets, WordPress settings, or adding or removing users.
An Editor’s job involves one major thing: content. And that’s all they’ll be able to access in the WordPress dashboard. Editors can also manage categories on the site along with adding or deleting custom tags. Taxonomies and uploading files to the site is another responsibility of the Editor role. Editors also have full control of comments. They can moderate, approve, or delete any comment.
Who Should Have the Editor User Role?
The Editor’s role should go to someone Administrator’s trust. Roles can be tweaked throughout WordPress; if needed, permissions of the Editor role can be reduced or changed as trust is gained.
- The manager of a content team or online publication
- Marketing managers responsible for content
- Small business owners can wear both hats (Administrator and Editor user role)
Editor vs. Author
New users may see WordPress Editors and Authors in the same light. In many ways, they are however, there are differences.
- Pages: Editors have access to all pages with permission to add, edit, or delete. Authors have no such access
- Content: Editors have access to all content on the site. In a multisite network, only the permissions given the Editor role. Editors can delete or edit all content. Authors have access to edit or delete, only the content they have produced
4. Author
As you probably suspected, the Author user role in WordPress has the ability to write, draft and publish new content on your site. They also have access to content in your WordPress media library. They’ll need this level of access to produce great blog posts.
The Author user role is normally assigned to new associates that you hire to focus on pushing out great content. Authors have a limited set of permissions within a WordPress installation. The role can add, edit, or delete their content, but have no access to other content, or site settings. Author roles can be as extensive or limited as the Editor or Administrator allows. The authors have permission to upload content and images.
The Author role also has the power to edit reader comments. However, they can only edit comments that are left on their posts.
Authors won’t be able to access posts or pages created by other users. They also can’t add plugins, create any new categories, change site settings or do anything else that will impact site performance.
Who Should Have the Author User Role?
- Organizations that have dedicated content creation or marketing teams such as reporters, public relations, company spokespeople
- Any company that distributes information such as a news channel, or sports companies should give reporters the Author role. Additional permissions can be given on an as-needed basis
A Note of Caution For the Author Role
- Be cautious giving the user role of Author to someone who is not in your employ or untrustworthy. If they have created a lot of content and then leave the company, the Author can delete every bit of content.
- It is always a best practice to delete ANY Author user role leaving the site and reassign the content to another Author. If a user is leaving with plans to return, change the password immediately and take away any granted permissions. Reinstate the role when the user returns.
5. Contributor
The Contributor user role can write blog posts or articles but can’t publish them. When they complete a draft, it goes into the draft section for an Administrator or Editor to review before publishing.
The Contributor user role has very few permissions in a WordPress installation. The default permission is the ability to submit content for review. Contributors cannot publish the content or upload any associated images. Only an Editor or an Administrator can publish the content. Once the content is published, a Contributor no longer has access to that content.
Contributors submit their content to either an Administrator or Editor for review. Here is an overview of the post submit and approval process:
- Contributors write their content in the WordPress Editor and when completed, hit the “Submit for Review” button
- Editors or an Administrator logs into WordPress and locates the post from pending approvals
- The post is edited for any grammatical errors and images should be inserted at this stage. The Admin or Editor then hits the “Publish” button.
- Any future edits or changes need to be done by the Administrator or Editor because the original Contributor no longer has access to the post.
A Contributor also won’t have any access to the WordPress media library. Adding photos, images or videos to an article submitted by a Contributor will be up to an Admin or Editor.
Those assigned permissions as a Contributor also can’t delete, alter or approve user comments.
Who Should Have the Contributor User Role?
Do you have community members that contribute articles and content to your site? Do you allow guest posts? If so, Contributor is the role you’d assign them.
- Writer’s outside the organization who can contribute to the blog
- Entry-level content writers that need heavy editing should be contributors
Contributor vs. Author
- Publishing content: Authors have the permissions to publish and edit their content and no other. Contributors can only submit their posts for review. Once a Contributor’s content is published, only the Administrator or Editor can edit the piece
- Media and images: Contributors have no access to images or media. Authors can upload and edit their media
6. Subscriber
The Subscriber user role is the most bare-bones user role you can assign to someone on your WordPress site. In fact, WordPress uses this role as the default one for all new site users.
You can think of the Subscriber role similarly to one of your social media followers. Basically, a Subscriber follows your blog and wants to be a part of it.
Subscriber Capabilities
There are two main permissions for the WordPress Subscriber role. They can view their profile and view the dashboard. Subscribers have no permissions to edit content or any WordPress site settings.
Depending on the overall functionality of your site, a Subscriber may be able to interact with other users and Subscribers, but they don’t have any access to your WordPress dashboard or editing tools.
Subscribers can be used as an inclusionary or entry-level access tool for marketing purposes. By default, Subscribers have no access to any site settings or content, making the role inherently safe.
Who Should Have the Subscriber User Role?
As a marketing tool, the Subscriber role is a perfect entry point to your site. Subscribers have the most restrictive role; however, it gives the person a profile, which is all a person needs to feel included.
WordPress User Role Comparison Chart
Below is a comparison chart of WordPress user roles and their capabilities.
| Capability | Super Admin (in Multisite Setup) | Administrator | Editor | Author | Contributor | Subscriber |
|---|---|---|---|---|---|---|
| Create sites | Y | N | N | N | N | N |
| Delete sites | Y | N | N | N | N | N |
| Manage network | Y | N | N | N | N | N |
| Manage sites | Y | N | N | N | N | N |
| Manage network users | Y | N | N | N | N | N |
| Manage network plugins | Y | N | N | N | N | N |
| Manage network themes | Y | N | N | N | N | N |
| Manage network options | Y | N | N | N | N | N |
| Upload plugins | Y | Y (single site) | N | N | N | N |
| Upload themes | Y | Y (single site) | N | N | N | N |
| Upgrade network | Y | N | N | N | N | N |
| Setup network | Y | N | N | N | N | N |
| Activate plugins | Y | Y (single site or enabled by network setting) | N | N | N | N |
| Create users | Y | Y (single site) | N | N | N | N |
| Delete plugins | Y | Y (single site) | N | N | N | N |
| Delete themes | Y | Y (single site) | N | N | N | N |
| Delete users | Y | Y (single site) | N | N | N | N |
| Edit files | Y | Y (single site) | N | N | N | N |
| Edit plugins | Y | Y (single site) | N | N | N | N |
| Edit theme options | Y | Y | N | N | N | N |
| Edit themes | Y | Y (single site) | N | N | N | N |
| Edit users | Y | Y (single site) | N | N | N | N |
| Export | Y | Y | N | N | N | N |
| Import | Y | Y | N | N | N | N |
| Install plugins | Y | Y (single site) | N | N | N | N |
| Install themes | Y | Y (single site) | N | N | N | N |
| List users | Y | Y | N | N | N | N |
| Manage options | Y | Y | N | N | N | N |
| Promote users | Y | Y | N | N | N | N |
| Remove users | Y | Y | N | N | N | N |
| Switch themes | Y | Y | N | N | N | N |
| Update core | Y | Y (single site) | N | N | N | N |
| Update plugins | Y | Y (single site) | N | N | N | N |
| Update themes | Y | Y (single site) | N | N | N | N |
| Edit dashboard | Y | Y | N | N | N | N |
| Customize | Y | Y | N | N | N | N |
| Delete site | Y | Y | N | N | N | N |
| Moderate comments | Y | Y | Y | N | N | N |
| Manage categories | Y | Y | Y | N | N | N |
| Manage links | Y | Y | Y | N | N | N |
| Edit others post | Y | Y | Y | N | N | N |
| Edit pages | Y | Y | Y | N | N | N |
| Edit others pages | Y | Y | Y | N | N | N |
| Edit published pages | Y | Y | Y | N | N | N |
| Publish pages | Y | Y | Y | N | N | N |
| Delete pages | Y | Y | Y | N | N | N |
| Delete others pages | Y | Y | Y | N | N | N |
| Delete published pages | Y | Y | Y | N | N | N |
| Delete others posts | Y | Y | Y | N | N | N |
| Delete private posts | Y | Y | Y | N | N | N |
| Edit private posts | Y | Y | Y | N | N | N |
| Read private posts | Y | Y | Y | N | N | N |
| Delete private pages | Y | Y | Y | N | N | N |
| Edit private pages | Y | Y | Y | N | N | N |
| Read private pages | Y | Y | Y | N | N | N |
| Edit published posts | Y | Y | Y | Y | N | N |
| Upload files to media library | Y | Y | Y | Y | N | N |
| Publish posts | Y | Y | Y | Y | N | N |
| Delete published posts | Y | Y | Y | Y (if author) | N (if author) | N |
| Edit posts | Y | Y | Y | Y (if author) | Y (if author) | N |
| Delete posts | Y | Y | Y | Y (if author) | Y (if author) | N |
| Read pages and posts | Y | Y | Y | Y | Y | Y |
How Do I Add a New User in WordPress?
Adding a new user in WordPress requires that you be an Admin user. From there, adding a new user in WordPress is a pretty straightforward process. This is where you will initially assign the user a role and permissions.
Of course, as an Administrator, you can always change the user’s role later on if better suits your needs. More on that in a minute.
The steps to add a new user to your WordPress site are as follows:
1. Login to the WordPress Admin dashboard (https://examplesite.com/wp-admin).
2. In your WordPress Admin dashboard menu, click on the Users menu item, then click Add New.

3. Enter the new user’s name, email address, first and last name and website.
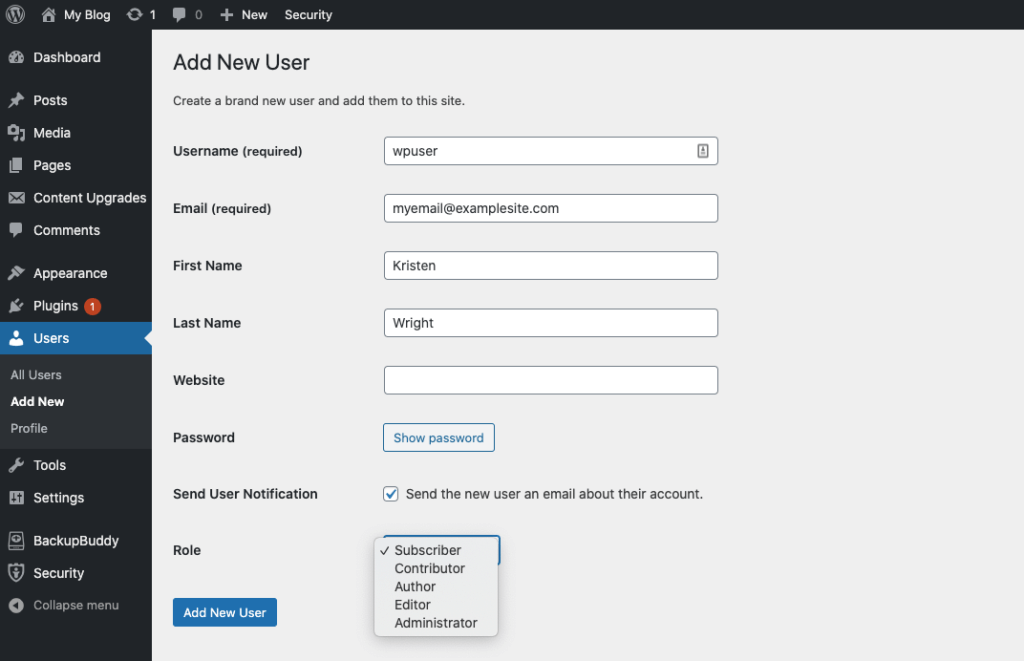
4. Select the user role as defined above.
5. Click the checkbox in front of “send the new user an email about their account.”
6. Click the Add New User button and the new user is added.
Repeat these steps for each new user, paying close attention to the user roles and permissions you assign to each.
Tips For Adding New WordPress Users
Author, Contributor, and Subscriber roles are straight forward in their creation and permissions. The Super Admin, Administrator, and Editor positions can be a major area of strength for the organization if carefully considered and plotted out.
- Multi-site installations should have one Super Admin, regardless of the number of additional sites. If there is any security, user, or core file issue, Super Admins are responsible. Security should be on the mind of every person involved with a website. WordPress is exceptional in the way it updates core files and security; however, having multiple Super Admins can cause havoc.
- Designate a single Administrator or Editor for each additional site in a multisite network. If there are hundreds of virtual sites, give Administrators or Editors more than one site to manage.
- Freelance web developers selling sites or agencies should give Administrator duties to each site owner, but strictly forbid access to any network setting.
How Do I Find User Roles in WordPress?
For existing users, you may want to look into the user roles that are currently assigned. After all, some of these roles may have been assigned before you had a thorough understanding of WordPress user roles and permissions.
Now is the time to verify your currently assigned user roles.
To do this, simply follow these steps:
1. Login to the WordPress admin dashboard.
2. In your WordPress admin dashboard, click on the Users section, then click All Users.
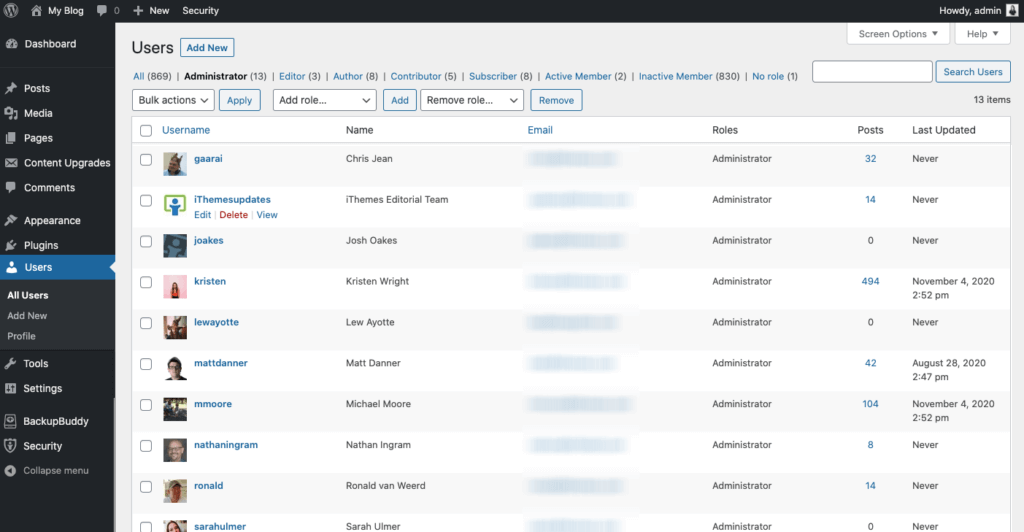
4. View the list of all of your current users.
5. Next to the Email column, you’ll see Role. This is the user role assigned to each site user.
Now that you’re aware of the role assigned to each user, perhaps you want to make a few assignment adjustments.
How Do I Change User Roles in WordPress?
A WordPress user role change is immediate and the user will be notified by email of their new role on your site.
To change a WordPress user role, follow steps 1-4 above. Once you’re viewing the list of all of your site users, you’ll want to:
1. Hover over the name of the user you want to update. Upon hovering over the selected user, you’ll get edit options presented to you.
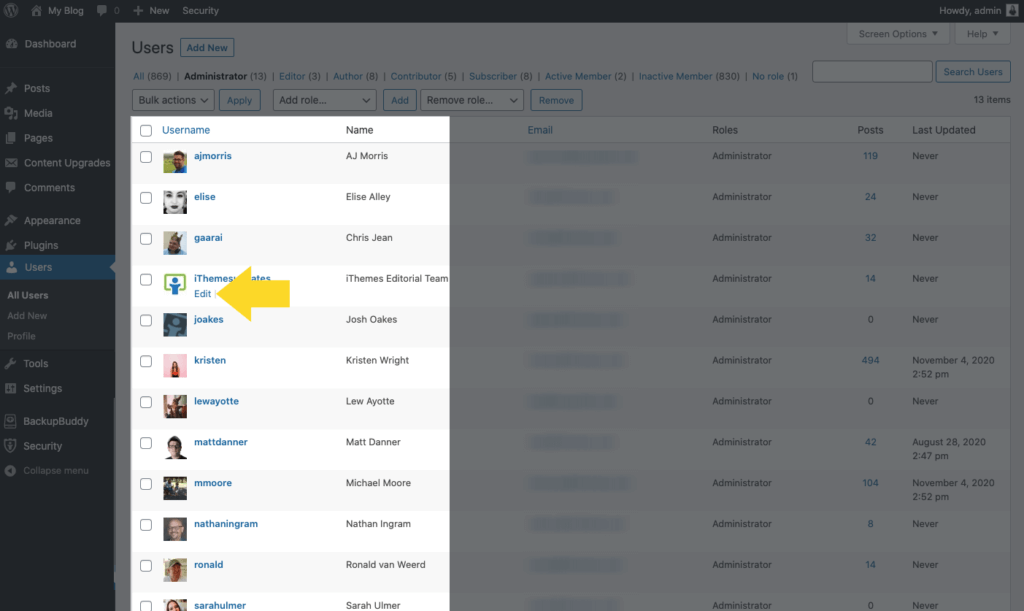
2. After clicking to edit, you’ll be able to change fields such as name, email and website. You cannot, however, change a username here.
3. At the bottom of the user profile, you’ll see a dropdown menu that allows you to change/select the user role.
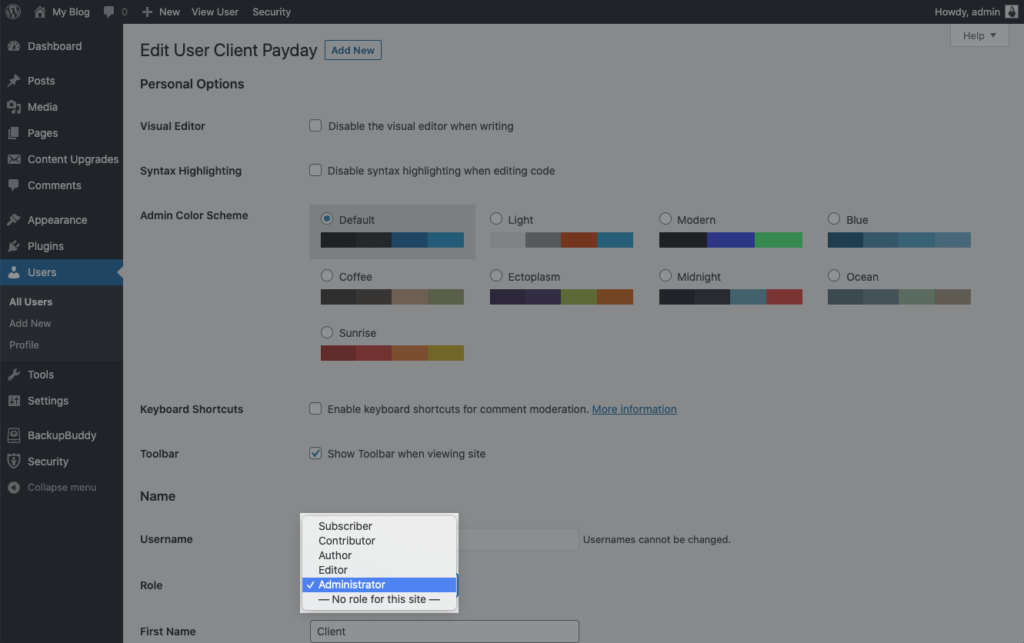
4. Choose the new user role.
5. Save the user profile.
The role and permission changes are implemented by WordPress the instant you save them.
How Do I Delete An Existing User?
There will probably be times when a user needs to be removed completely from your site.
Perhaps you hired a temporary freelance Editor to provide editing services for your site over the course of two months. When the two-month time period expires and the contract is up, you no longer want the freelancer to have access to your site.
To delete this user and remove all of their permissions to your website, follow steps 1-4 listed above for finding a user.
After you locate the user that will be deleted, hover over their name and click on the delete option.
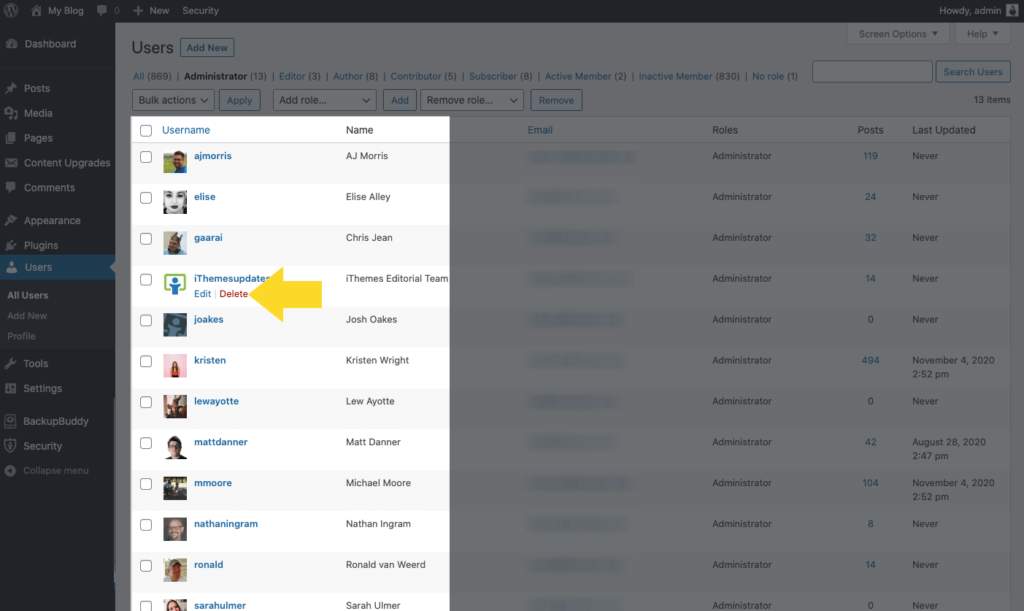
After you confirm the deletion, the user will be notified via email that they have been removed from your site. They’ll no longer have any credentials to log in.
It’s important to note that you cannot delete yourself or other Administrators (unless you’re a Super Administrator on a multi-site account).
How Do I Manage User Roles in WordPress?
The way you choose to manage user roles and permissions on your WordPress site is completely up to you. After all, who knows your team members abilities and limitations as well as you do?
Before you choose the roles that are appropriate for each user on your site, step back and ask yourself a series of questions about them.
- Can the user be trusted to fully manage your WordPress dashboard?
- Do you have trust in the user to properly organize the content on your site?
- Do you need to review the user’s posts before they get published? Or do you trust their judgment?
- Should the user have the capability of editing and publishing posts from other users?
Before assigning a new user to the Administrator role, it’s important that they have a thorough understanding of the WordPress platform.
WordPress User Security
The security of the users on your website matters. A a lot! Why? A single Admin user with a weak password could undermine all of the other website security measures you have put into place. That is why it is so important for you to audit the strength of security used by the Administrator and Editor users on your website.
The iThemes Security Pro plugin’s User Security Check allows you to quickly audit and modify 5 critical elements of user security:
- Two-Factor Authentication Status
- Password Age & Strength
- Last Time Active
- Active WordPress Sessions
- User Role

In addition, the iThemes Security Pro plugin has a ton of tools that you can use to increase the WordPress user security on your website. The Two-Factor Authentication and Password Requirements features alone protect your WordPress users from 100% of automated bot attacks.
However, these two user security tools are only effective if the users on your website are actually using them.
Get the bonus content: A Guide to WordPress Security
7 Tips to Secure Your WordPress Users
Let’s take a look at the things you can do to secure your WordPress users. The truth is that these security methods will help secure every type of WordPress user. But, as we go through each of the methods, we will let you know which users you should require to use the method.
1. Only Give People the Capabilities They Need
The easiest way you can protect your website is by only giving your users the capabilities they need and not anything more. If the only thing someone is going to do on your website is to create and edit their own blog posts, they don’t need the capability to edit other people’s posts.
2. Limit Login Attempts
Brute force attacks refer to a trial and error method used to discover username and password combinations to hack into a website. By default, there isn’t anything built into WordPress to limit the number of failed login attempts someone can make.
Without a limit on the number of failed login attempts, an attacker can make, they can keep trying an endless number of usernames and passwords until they are successful.
The iThemes Security Pro Local Brute Force Protection feature keeps tracks of invalid login attempts made by IP addresses and usernames. Once an IP or username has made too many consecutive invalid login attempts, they will get locked out and will be prevented from making any more login attempts.
3. Secure WordPress Users with Strong Passwords
The stronger your WordPress user account password is, the harder it is to guess. It takes 0.29 milliseconds to crack a seven-character password. But, a hacker needs two centuries to crack a twelve character password!
Ideally, a strong password is a twelve character long alphanumeric string. The password should contain upper and lower case letters as well as other ASCII characters.
While everyone can benefit from using a strong password, you may only want to force people with Author level capabilities and above to have strong passwords.
The iThemes Security Pro Passwords Requirement feature allows you to force specific users to use a strong password.
4. Refuse Compromised Passwords
Hackers often use a form of a brute force attacked called a dictionary attack. A dictionary attack is a method of breaking into a WordPress website with commonly used passwords that have appeared in database dumps. The “Collection #1? Data Breach that was hosted on MEGA hosted included 1,160,253,228 unique combinations of email addresses and passwords. That is billion with a b. That kind of score will really help a dictionary attack narrow the most commonly used WordPress passwords.
It is a must to prevent users with Author level capabilities and above from using compromised passwords. You may also think about not letting your lower level users use compromised passwords.
It is completely understandable and encouraged to make creating a new customer account as easy as possible. However, your customer may not know that the password they are using has been found in a data dump. You would be doing your customer a great service by alerting them to the fact that the password they are using has been compromised. If they are using that password everywhere, you could save them from some major headaches down the road.
The iThemes Security Pro Refuse Compromised Passwords feature forces users to use passwords that have not appeared in any password breaches tracked by Have I Been Pwned.
5. Secure WordPress Users with Two-Factor Authentication
Two-factor authentication is a process of verifying a person’s identity by requiring two separate methods of verification before they can login. Google shared on its blog that using two-factor authentication can stop 100% of automated bot attacks. I really like those odds.
At the very least, you should require your Admins and Editors to use two-factor authentication.
The iThemes Security Pro Two-Factor Authentication feature provides a ton of flexibility when implementing 2fa on your website. You can enable two-factor for all or some of your users, and you can force your high-level users to use 2fa on each login.
6. Limit Device Access to the WP Dashboard
Limiting access to the WordPress dashboard to a set of devices can add a strong layer of security to your website. If a hacker isn’t on the correct device for a user, they won’t be able to use the compromised user to inflict damage on your website.
You should only limit device access to your Admins and Editors.
The iThemes Security Pro Trusted Devices feature identifies the devices that you and other users use to login to your WordPress site. When a user has logged in on an unrecognized device, Trusted Devices can restrict their administrator-level capabilities. This means that if an attacker were able to break into the backend of your WordPress site, they wouldn’t have the ability to make any malicious changes to your website.
7. Secure WordPress Users from Session Hijacking
WordPress generates a session cookie every time you log into your website. And let’s say that you have a browser extension that has been abandoned by the developer and is no longer releasing security updates. Unfortunately for you, the neglected browser extension has a vulnerability. The vulnerability allows bad actors to hijack your browser cookies, including the earlier-mentioned WordPress session cookie. This type of hack is known as Session Hijacking. So, an attacker can exploit the extension vulnerability to piggyback off your login and start making malicious changes with your WordPress user.
You should have session hijacking protection in place for your Admins and Editors.
The iThemes Security Pro Trusted Devices feature makes Session Hijacking a thing of the past. If a user’s device changes during a session, iThemes Security will automatically log the user out to prevent any unauthorized activity on the user’s account, such as changing the user’s email address or uploading malicious plugins.
WordPress User Role Plugins
When you dive into WordPress user role plugins, you’ll find that a lot of the most popular plugins utilize and manage user roles and permissions outside of the main six roles we’ve discussed.
There are plugins that allow you to make and assign custom user roles and groups. The plugins we’ll cover here are:
- bbPress
- BuddyPress
- WooCommerce
- Restrict Content
- iThemes Security
They each work with customizable user roles in different ways.
bbPress
The bbPress plugin is a WordPress discussion forum that requires unique user roles outside of the main six offered within WordPress.
The first user role built into the bbPress plugin, Keymaster, sits on top of the mountain. Keymasters are similar to the Administrator role in WordPress. They have access to all tools and settings, and can edit, create or delete the forums, topics, comments and replies of other users. The Keymaster is also a forum moderator and manages all tags.
bbPress then offers the Moderator role. This role is responsible for creating, editing, deleting and moderating forums. They also have full control over user topics and replies. However, a Moderator doesn’t have access to site settings.
A Participant is a member of the community. They can create and edit their topics and replies, but nothing else.
Spectators can only read topics and replies. They can’t reply or get involved in other ways.
Blocked users are ones that you simply don’t want in the community any longer.
The bbPress plugin also allows you to make your own customized user roles (Pupil and Tutor, for example) by adding code into the codex. You will be able to assign your own customized permissions to each role you create. You can also change the names of the existing bbPress user roles.
BuddyPress
BuddyPress is a WordPress community plugin that allows you to build a social network within your own website.
With the BuddyPress plugin, you’ll be able to make you own private, public and hidden groups. You can then assign user roles to manage your groups.
The Member user role is the default role within BuddyPress. This gets applied to any user who signs up and joins a group. A user with a Member role can submit and post content to the group forums. In some cases, they can see other group members and send them invites or direct messages.
A BuddyPress Moderator is an upgraded user role with additional permissions including closing, editing or deleting topics in the forum. But be careful, because they’ll also be able to do the same with content produced by other plugins you’re running on your WordPress site.
As with the WordPress platform and other plugins, the Administrator role in BuddyPress has full control over groups and settings. An Administrator can change the settings in a group, the group avatar, and manage group members.They can also delete entire groups.
WooCommerce
WooCommerce is a highly popular WordPress plugin that will help turn your WordPress site into a robust ecommerce site.
When you install WooCommerce on your site, you’ll instantly have the power to start listing products, posting product images, writing product descriptions and taking online orders.
As such, WooCommerce offers two user roles that are outside of the standard six in WordPress. These roles are:
- Customer: any user that signs up on your WooCommerce site or registers with you at checkout. Customers are very similar in permissions to Subscribers.
- Shop Manager: this is the person that manages the WooCommerce shop but does not have Administrator permissions. They will automatically have Customer permissions but can also manage products that are listed in the store, as well as view sales reports.
Pretty straightforward stuff.
Restrict Content
The free Restrict Content plugin allows you to set up content restriction based on custom membership levels which can be applied to the default WordPress user roles. This can be helpful for controlling who can see content on a WordPress site, based on their membership level and/or WordPress user role.
Use Restrict Content as a WordPress content restriction plugin to:
- Restrict access to your WordPress site based user role. Limit access to full content via a simple interface on the post, page, and custom post type editing screens.
- Control user access to content based on WordPress user role, access level(s), or membership level(s).
- Protect sensitive content.
- Clearly separate public content from private content
- Restrict access to entire pages or specific sections
- Let users register and login from the frontend of your site
iThemes Security
iThemes Security is an excellent WordPress security plugin with 30+ ways to secure your WordPress website, including ways to specific features for WordPress user roles.
For example, if you’re looking for a plugin that can provide fast and easy user role upgrading and downgrading capabilities with temporary privilege escalation, the iThemes Security plugin is definitely worth checking out.
You can also use the plugin to save a lot of the time you spend securing your website with User Groups. To make it easier to manage the user security on your site, iThemes Security Pro sorts all of your users into different groups. By default, your users will be grouped by their WordPress user roles and capabilities. Sorting by WordPress user role allows for easy combining of WordPress and custom user roles into the same group.

For example, if you are running a WooCommerce site, your site Administrators and Shop Managers will be in the Admin User Group, and your Subscribers and Customers will be in the Subscriber User Group.
In the User Groups settings, you will see all your user groups and all of the security settings that are enabled for each group, and quickly toggle the settings on and off. User Group gives you the confidence you are applying the right level of security to the right WordPress user roles.
How to Customize WordPress User Roles & Permissions
Beyond the user roles we’ve already discussed, you can add more roles by using plugins designed to allow you to create custom user roles for WordPress. Here are a few plugins and tools to check out.
iThemes Sync Client Dashboard
iThemes Sync is a tool to help you manage multiple WordPress sites. With Sync, you have one dashboard to perform WordPress admin tasks for all your WordPress websites. Sync is especially helpful if you build or maintain websites for clients as an web design agency, marketing agency or freelancer.
The iThemes Sync Client Dashboard feature was built to customize how a user sees the WordPress admin dashboard, which is a way of customizing WordPress user roles and permissions.
For example, if you have a client that you want to make an Administrator, but don’t want to see certain areas of the site such as themes or plugins, you can accomplish this task with Client Dashboard.
Client Dashboard can be activated on a per-user basis, and then you can select the WordPress dashboard menu items to allow that user to see. Pretty cool, right?

User Role Editor
If you want to customize your standard user roles in WordPress, the User Role Editor is a good plugin to look into. The User Role Editor will allow you to create your own roles, permissions and user capabilities.
You can also use it to change or rename roles, or delete them altogether. The plugin has a free and a paid version.
Advanced Access Manager
Whether you’re running a huge WooCommerce store on your site or operating a standard WordPress blog, you may be looking for additional control over managing access to your content.
User Access Manager could be the plugin to help you out. Advanced Access Manager can be used to set up a restricted member area of your site, utilizing user roles and permissions. It also assists you in managing users in the private sections of your site.
Yoast SEO
If your team is focused on improving the SEO (search engine optimization) of your content, the Yoast SEO plugin is a great place to start.
This plugin allows you to create two non-standard user roles:
Why are these two new user roles beneficial to you as a WordPress site owner?
By assigning roles within Yoast SEO, you’ll empower your team to do SEO-related work without needing to manually track results or ask you to make site changes whenever needed.
As Yoast’s blog says:
“Two new roles, the SEO editor and SEO manager, make for a much more flexible solution when working with multiple people on your site. The Administrator can determine who gets to see and do what, while the users get the tools they need to do their work.”
The Yoast SEO plugin is yet another tool that puts WordPress user roles and permissions at the forefront of administrative efficiency.
Wrapping Up: Understanding User Roles and Permissions in WordPress
To recap: The top three management user roles in a WordPress installation have areas of the site specifically designed for that position. Super Admins and Administrators control the dashboard and core files, and the site itself. While Editors control the content manager and other content. Authors and Contributors control only their content and no other. Subscribers can access only the content and permissions given to the role by the management positions.
After studying the information in this article, you now have a much deeper understanding of user roles and permissions in the WordPress platform. As you can see, the roles you assign to each of your users plays a big part in how efficiently you run your website.
But no matter how careful you are on making sure that all user roles are assigned to the best people, sometimes mistakes will happen. For example, when the new employee that you just assigned as an Administrator causes your site to crash when activating a new and untested plugin, a WordPress backup plugin like BackupBuddy will be an absolute life saver. Make sure to have your backup plugin installed and activated before a disaster like this happens.
As with other areas of WordPress, properly assigning user roles and permissions will take a little trial and error. But with the information you’ve just learned, you’ll be making more informed decisions.
Get the bonus content: Getting Started with WordPress
Kristen has been writing tutorials to help WordPress users since 2011. As marketing director here at iThemes and Restrict Content Pro, she’s dedicated to helping you find the best solutions to build and run effective WordPress websites. Outside of work, Kristen enjoys journaling (check out her side project, The Transformation Year!), hiking and camping, cooking, and daily adventures with her family, hoping to live a more present life.
nttntttt