
Want to disable wp-cron and replace it with your own real cron job?
Replacing wp-cron with your own cron job can help you run your site’s scheduled tasks more reliably and also reduce the load on your server for high-traffic sites.
In this post, we’ll explain what wp-cron is and why you might want to disable it if you’re not familiar with this tactic. Then, we’ll show you step-by-step how to disable wp-cron and replace it with a real cron job.
If you’re already familiar with what wp-cron is and why you might want to disable it, you can click here to jump straight to the tutorial.
What is wp-cron?
Wp-cron is a file/feature that’s responsible for controlling your WordPress site’s time-sensitive tasks.
For example, let’s say you scheduled a post to publish next Wednesday at 9:30 AM. Wp-cron makes sure that happens on time (or at least as close to “on time” as possible – more on that in a second).
In addition to making sure core WordPress features function, many WordPress plugins also rely on wp-cron to handle schedule-sensitive parts of the plugin.
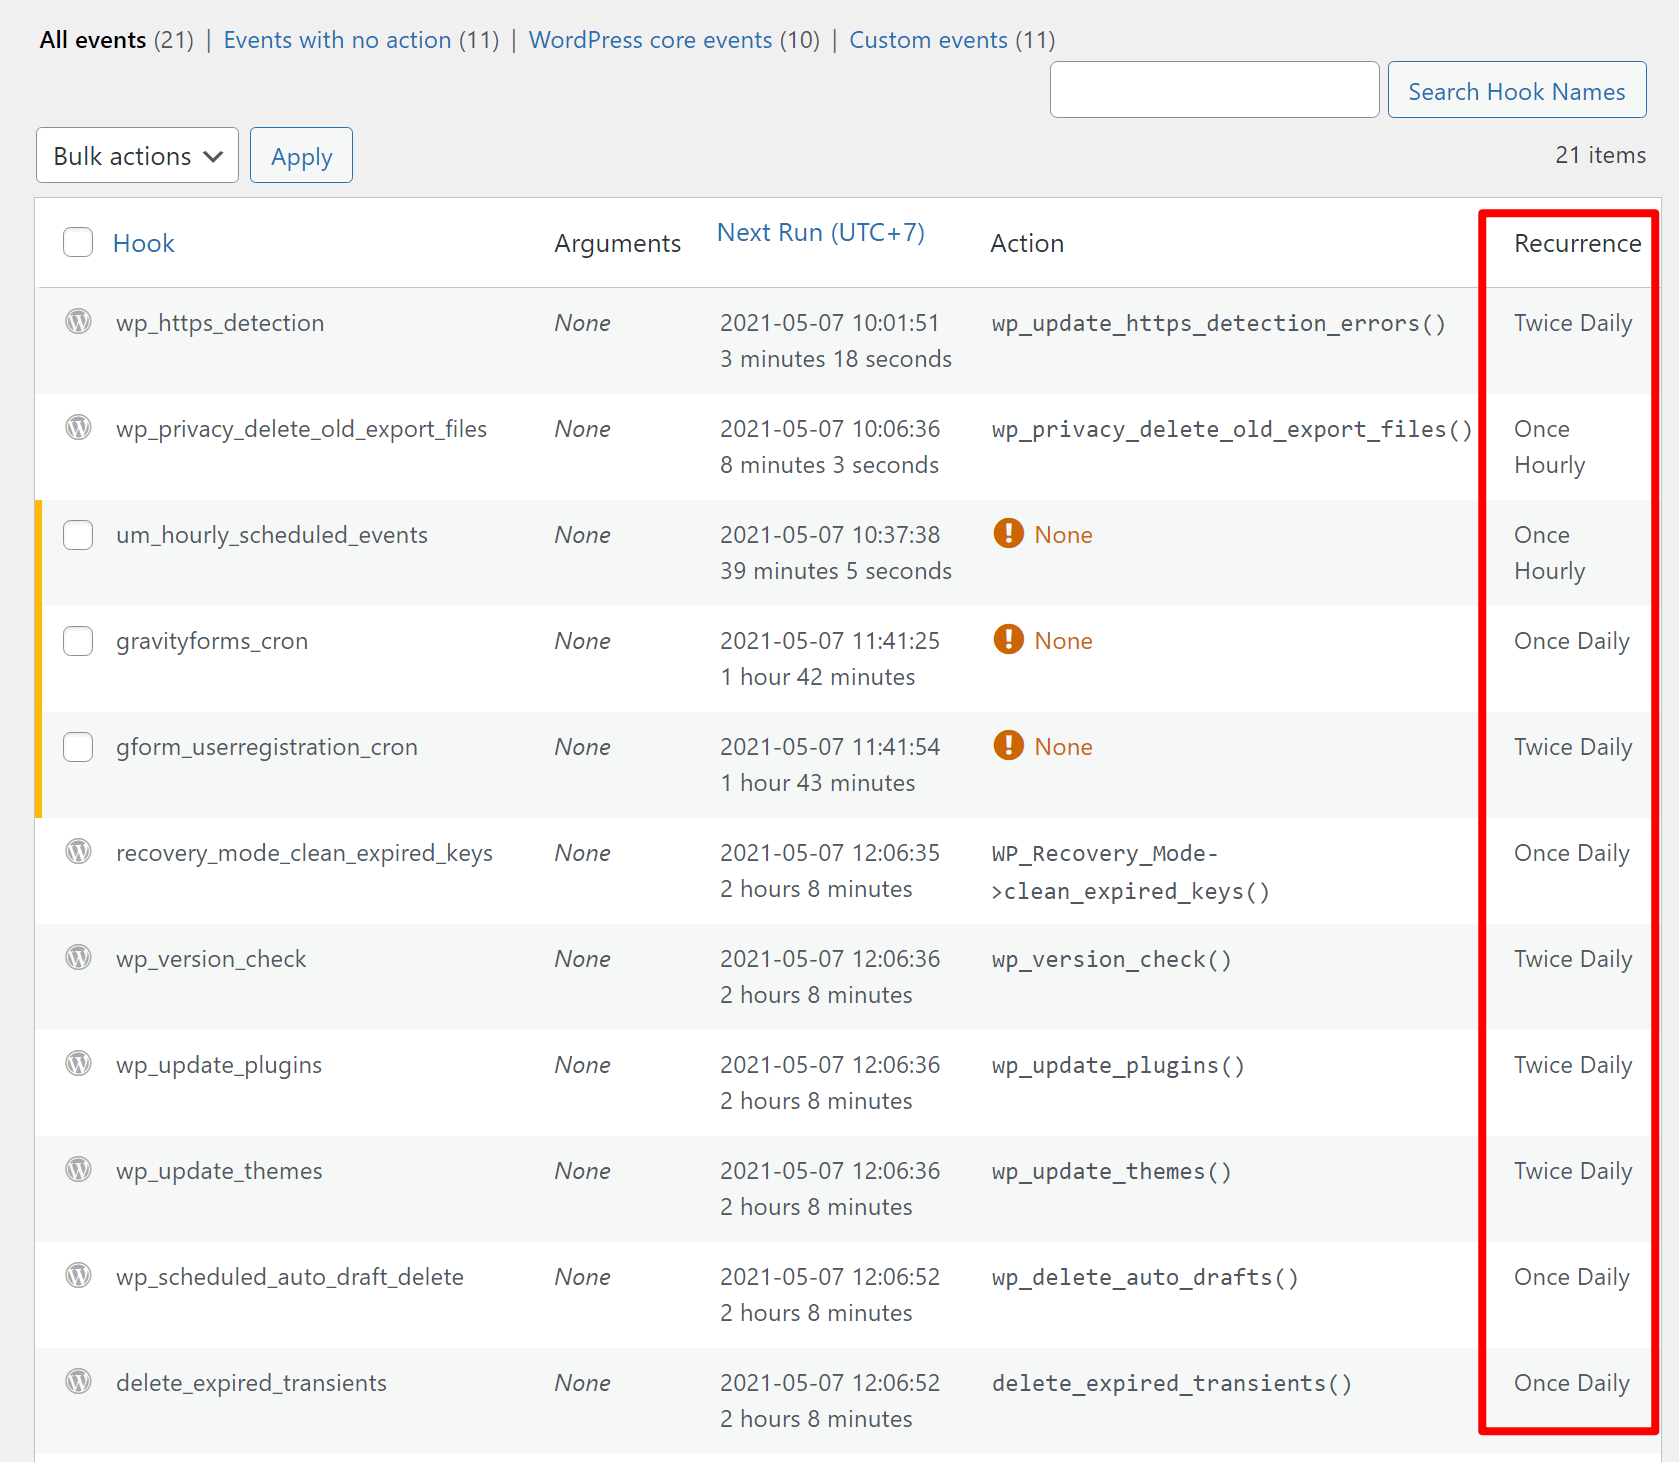
If you want to view all the scheduled tasks on your site, you can use a free plugin like WP-Crontrol. If you go to Tools → Cron Events, you can see all the automatic tasks that WordPress has scheduled to run and how frequently they execute:
As the name suggests, wp-cron comes from the more general cron scheduling system that’s used by Unix operating systems. However, wp-cron is distinct from those scheduling systems and wp-cron is not a real cron job.
The big difference is that wp-cron only executes when you or another person visits your website (either on the front-end or in your dashboard). Whenever someone visits your site, WordPress will run the wp-cron.php file and check for scheduled tasks. If there is a task, it will then execute it.
However, this can pose a problem for low-traffic sites because wp-cron only runs when there’s a visit. For example, let’s say you scheduled that post for Wednesday at 9:30 AM, but your site doesn’t receive any visits at that time. In fact, your site doesn’t receive its next visit until 11:30 AM.
Well, in that scenario, your post wouldn’t publish until 11:30 AM because wp-cron wasn’t able to run when there weren’t any visits. It would still show the timestamp as 9:30 AM – it just wouldn’t actually appear on your site until 11:30 AM.
Why should you disable wp-cron?
There are two reasons behind disabling wp-cron and replacing it with your own dedicated cron job:
- Reliability – as the example above illustrated, wp-cron isn’t always reliable on low-traffic sites because it needs a website visit to execute. With a real cron job, you can set your tasks to execute every X minutes no matter what – even if there are no visits.
- Performance – on high-traffic sites, some people don’t like wp-cron because WordPress will run the wp-cron.php file on almost every single visit. WordPress tries to limit this by not running it more than once per 60 seconds, but there can still be performance drags for various technical reasons, such as simultaneous visits both triggering wp-cron.
In a nutshell, learning how to disable wp-cron can be useful for both low-traffic and high-traffic sites, though for different reasons.
How to disable wp-cron (and set up a real cron job)
Now that you know the “what” and “why”, let’s get into the “how.” We’ll show you how to disable wp-cron and then replace it with your own server cron job (or another solution).
There are two parts to the process:
- You need to disable the built-in wp-cron feature so that WordPress doesn’t run wp-cron.php on every visit. To do this, you just need to add a line of code to your site’s wp-config.php file.
- You need to set up your own cron job to call wp-cron.php on the schedule that you set. With this, you can run wp-cron.php on a specific schedule, whether or not your site receives traffic.
Disable wp-cron in WordPress
To disable wp-cron, you need to add one line of code to your site’s wp-config.php file. Because this is a key configuration file, we highly recommend that you back up your site before making changes (or at least make a copy of the original wp-config.php file so that you can re-upload the working copy if something goes wrong).
To access the wp-config.php file, you can either:
- Connect to your server via FTP and find the file in the root directory (the same directory that contains the wp-admin and wp-content folders).
- Use something like cPanel File Manager to browse your server’s files from your web browser.
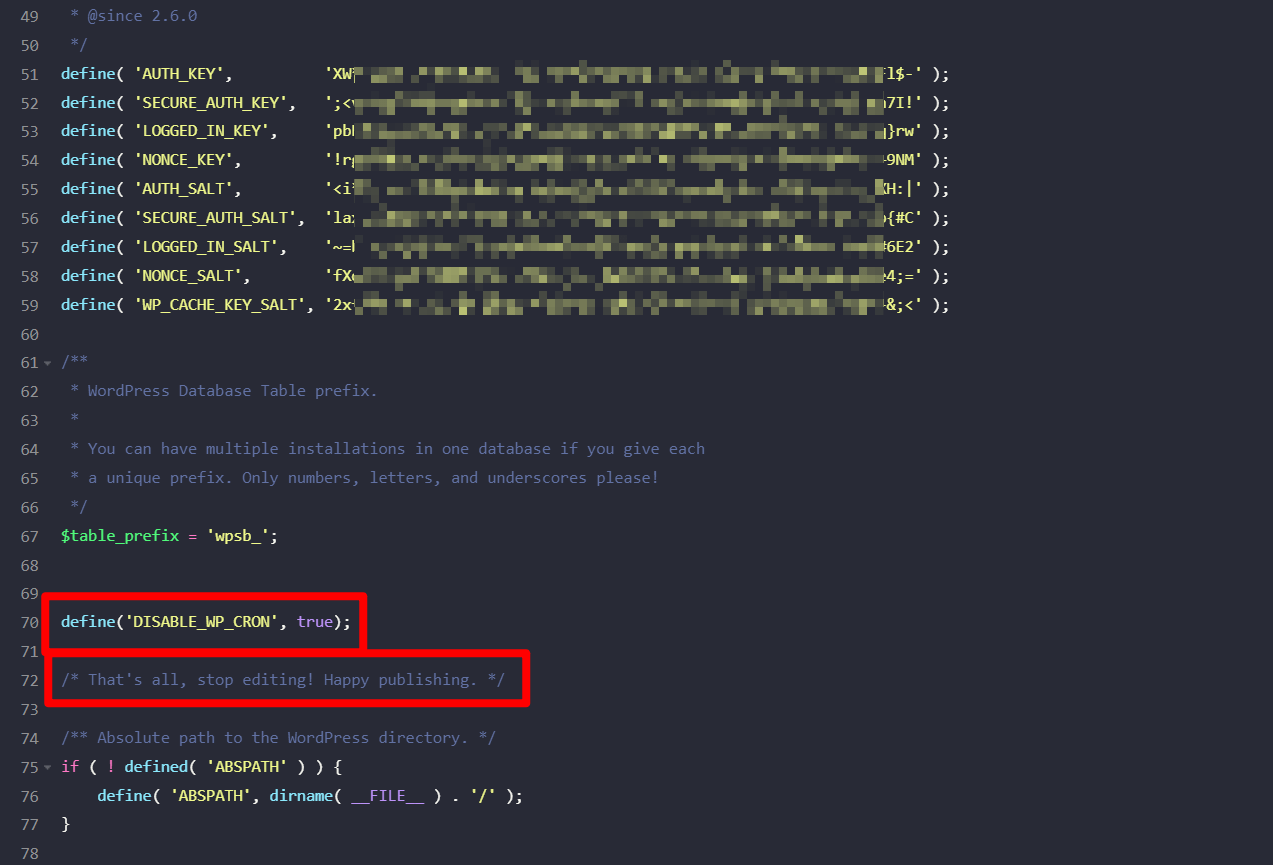
Once you have a backup of your site and/or the original wp-config.php file, add the following code snippet above the line that says /* That's all, stop editing! Happy publishing. */
define('DISABLE_WP_CRON', true);
Like so:
Save the changes and re-upload the file if needed.
Once you’ve done this, WordPress will no longer call the wp-cron.php file when people visit your website.
Set up your own cron job
When you’ve disabled wp-cron, you need to set up your own cron job so that your site’s automatic tasks still get run.
There are two ways that you can do this:
- You can create your own cron job at the server level using your hosting. The exact process varies depending on the hosting provider.
- You can use an online cron service, which are cloud-based tools that let you run the cron job using the service’s servers. Typically, these services have limited free plans, so you might need to pay. Thankfully, even the paid services are quite affordable (e.g. $12 per year).
I’ll show you how to set up both – but you only need to use one of these methods.
Set up a server cron job via your hosting
The process of setting up a server cron job varies depending on your host. Some make it very easy, while others don’t.
I’ll use cPanel for this example because it’s the most popular solution, but I recommend consulting your host’s support docs if your host doesn’t use cPanel or if you’re otherwise not sure where to find this feature (or if your host even allows it).
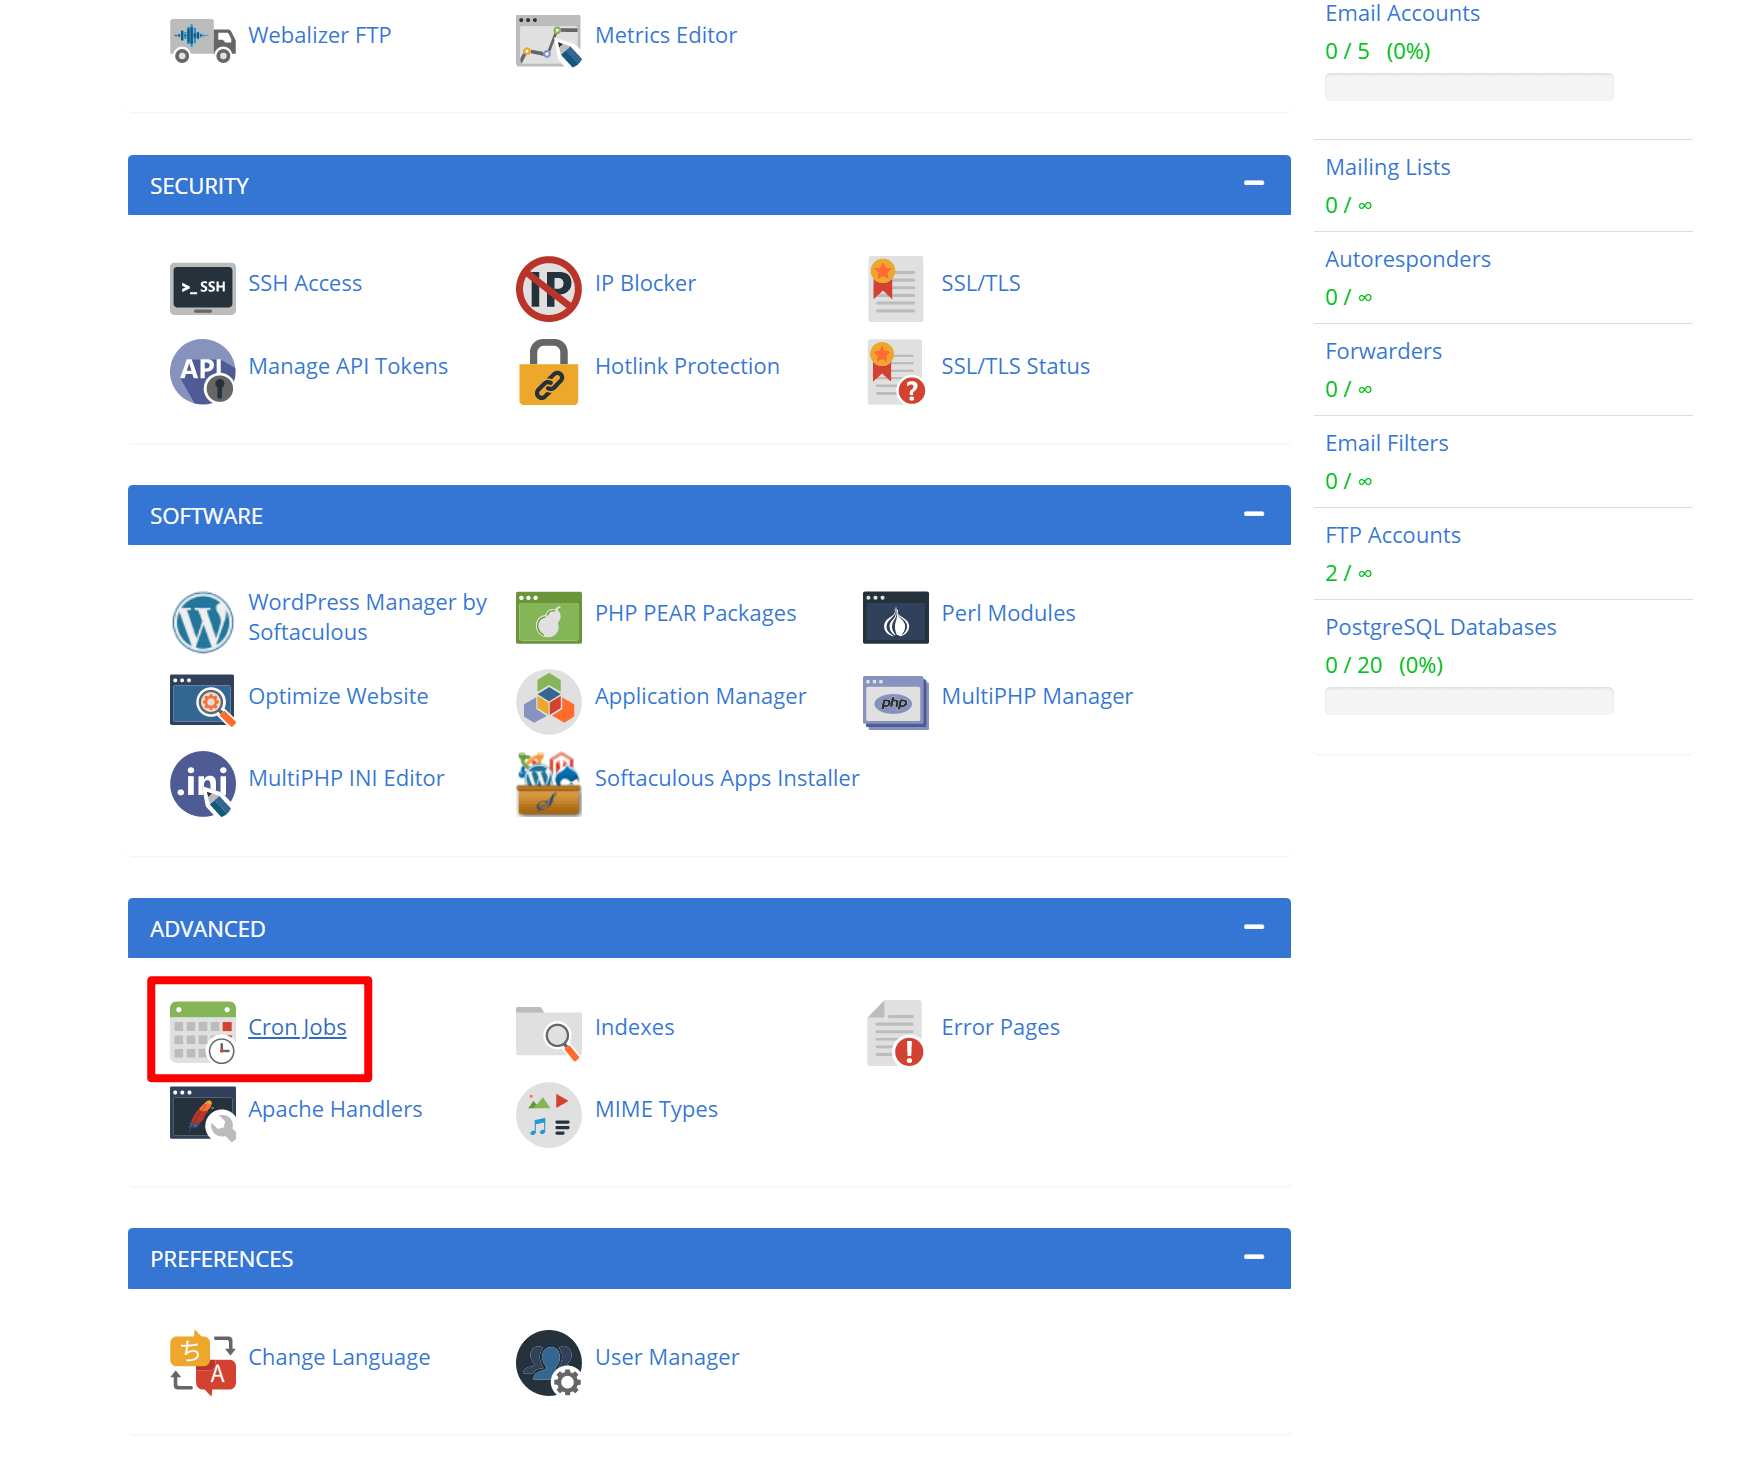
To get started, log into your hosting dashboard and go to cPanel. In the cPanel interface, you should find a tool called Cron Jobs (or something similar). Typically, it’s under the Advanced category, but it might be different depending on your host.
Select that tool:
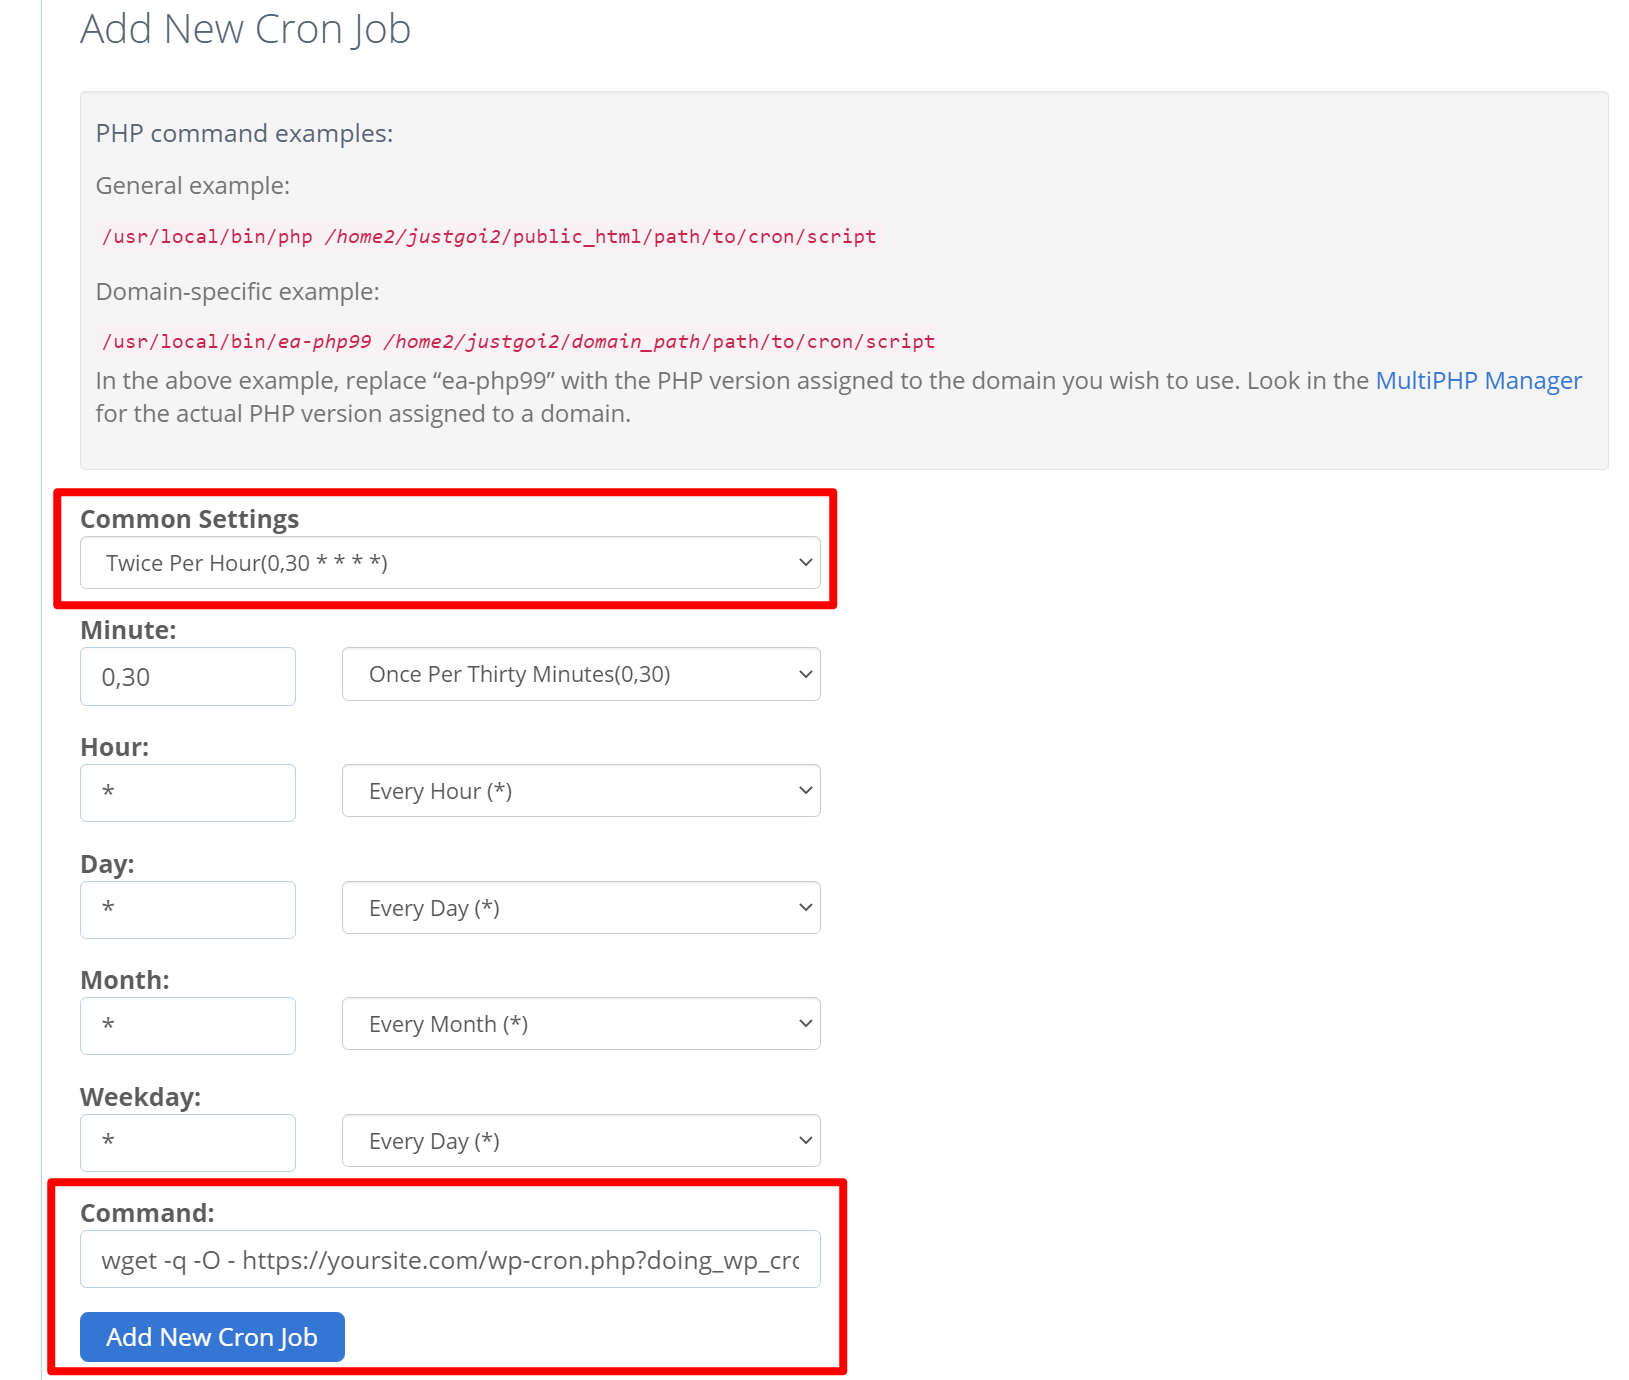
On the next page, find the Add New Cron Job section. You should see options to specify the timing, as well as a Command.
The timing is up to you, but usually running it every 30 minutes is a good starting point, especially on shared hosting. In fact, some shared hosts won’t let you run them more often.
You can choose Twice Per Hour from the Common Settings drop-down, which will pre-configure the rest of the timing settings. Or, you can use Crontab.guru to generate the syntax yourself – you would just need to plug in the details to the corresponding boxes.
Then, add the following line of code to the Command box:
wget -q -O - https://yoursite.com/wp-cron.php?doing_wp_cron >/dev/null 2>&1
Make sure to replace https://yoursite.com with the actual URL of your website.
For example, if your website is https://basketballfanatic.com, then the proper command would be:
wget -q -O - https://basketballfanatic.com/wp-cron.php?doing_wp_cron >/dev/null 2>&1
Make sure to click the Add New Cron Job button to save your cron job. Then, you should see it appear in the list of Current Cron Jobs below.
Use an online cron service
If your host doesn’t let you set up cron jobs or if you’d just prefer a simpler experience, you might want to use a dedicated cron service instead.
There are several popular options here, including the following:
We’ll use EasyCron for this tutorial.
EasyCron is free for up to 200 daily cron calls at a 20-minute max interval (which lets you run a single task every 20 minutes every day), which should be enough for a single WordPress site. The paid plans are also quite affordable, starting at just $12 per year.
To get started, register for a free account.
Then, click the + Cron Job button in the EasyCron interface:
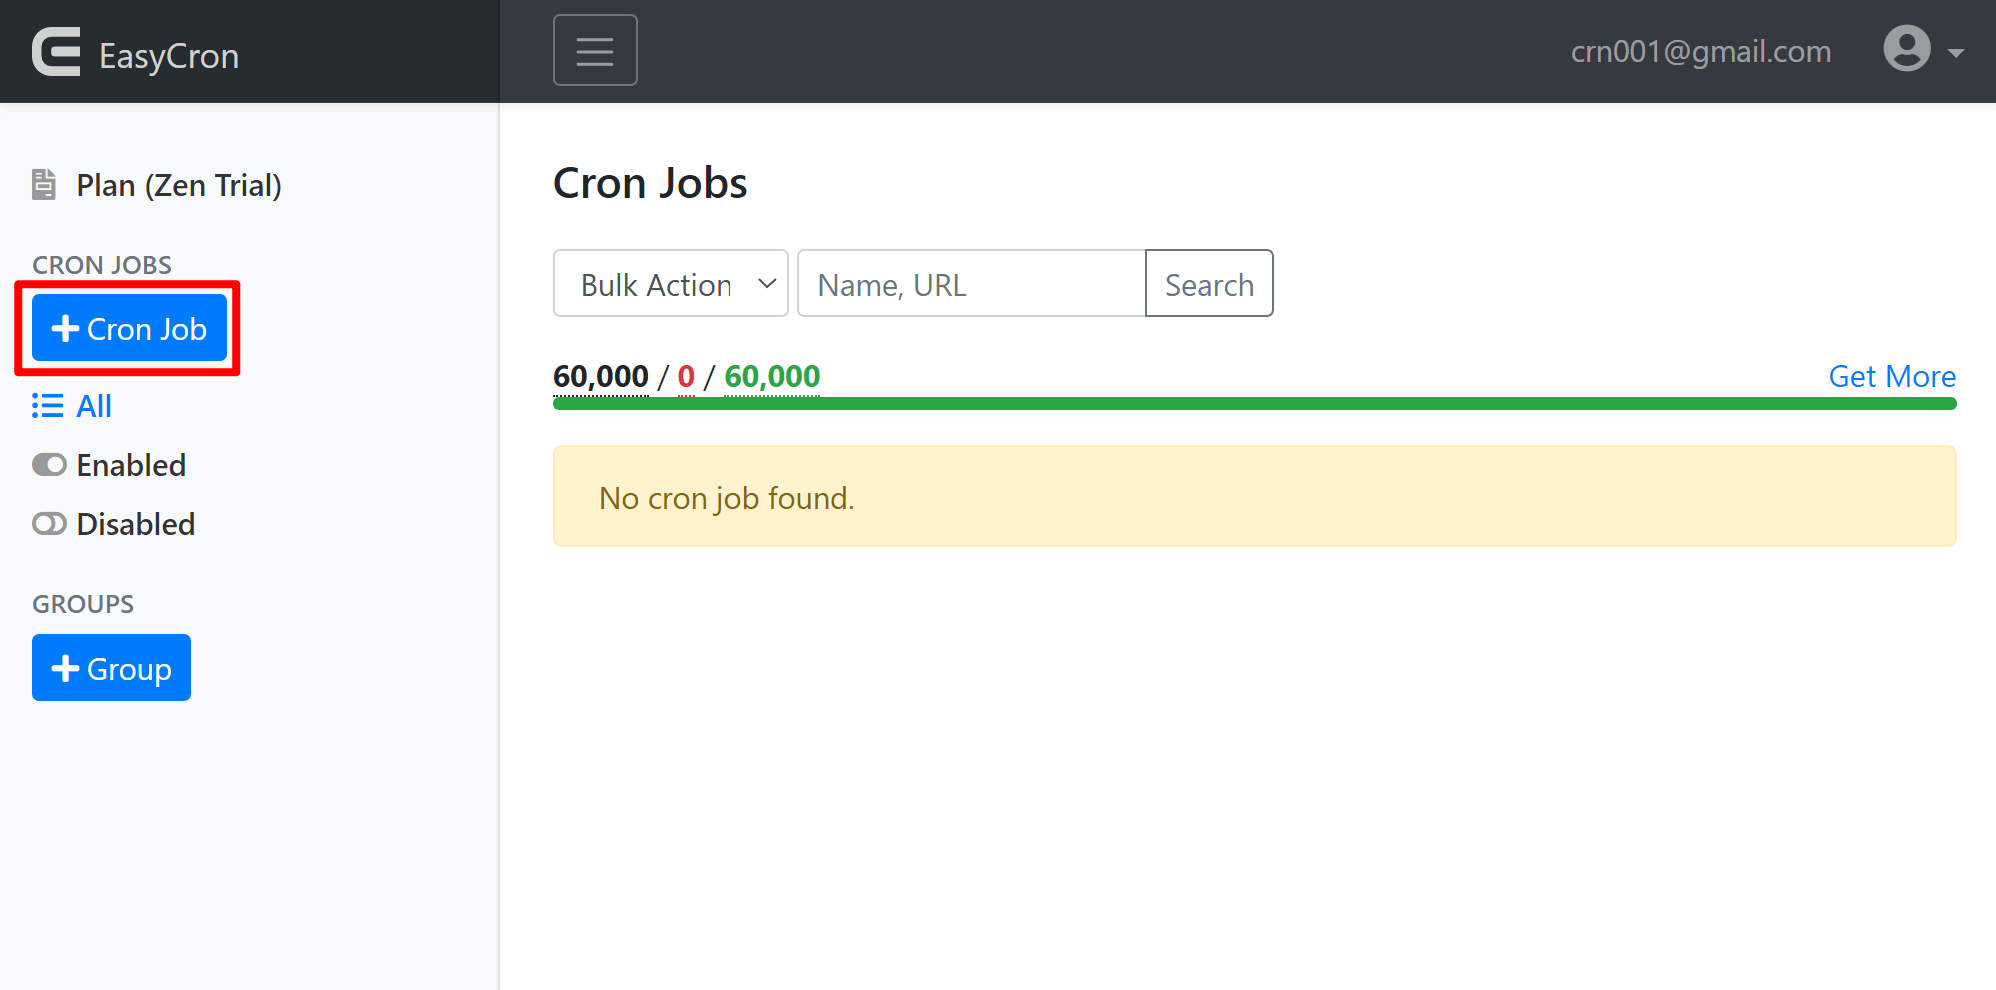
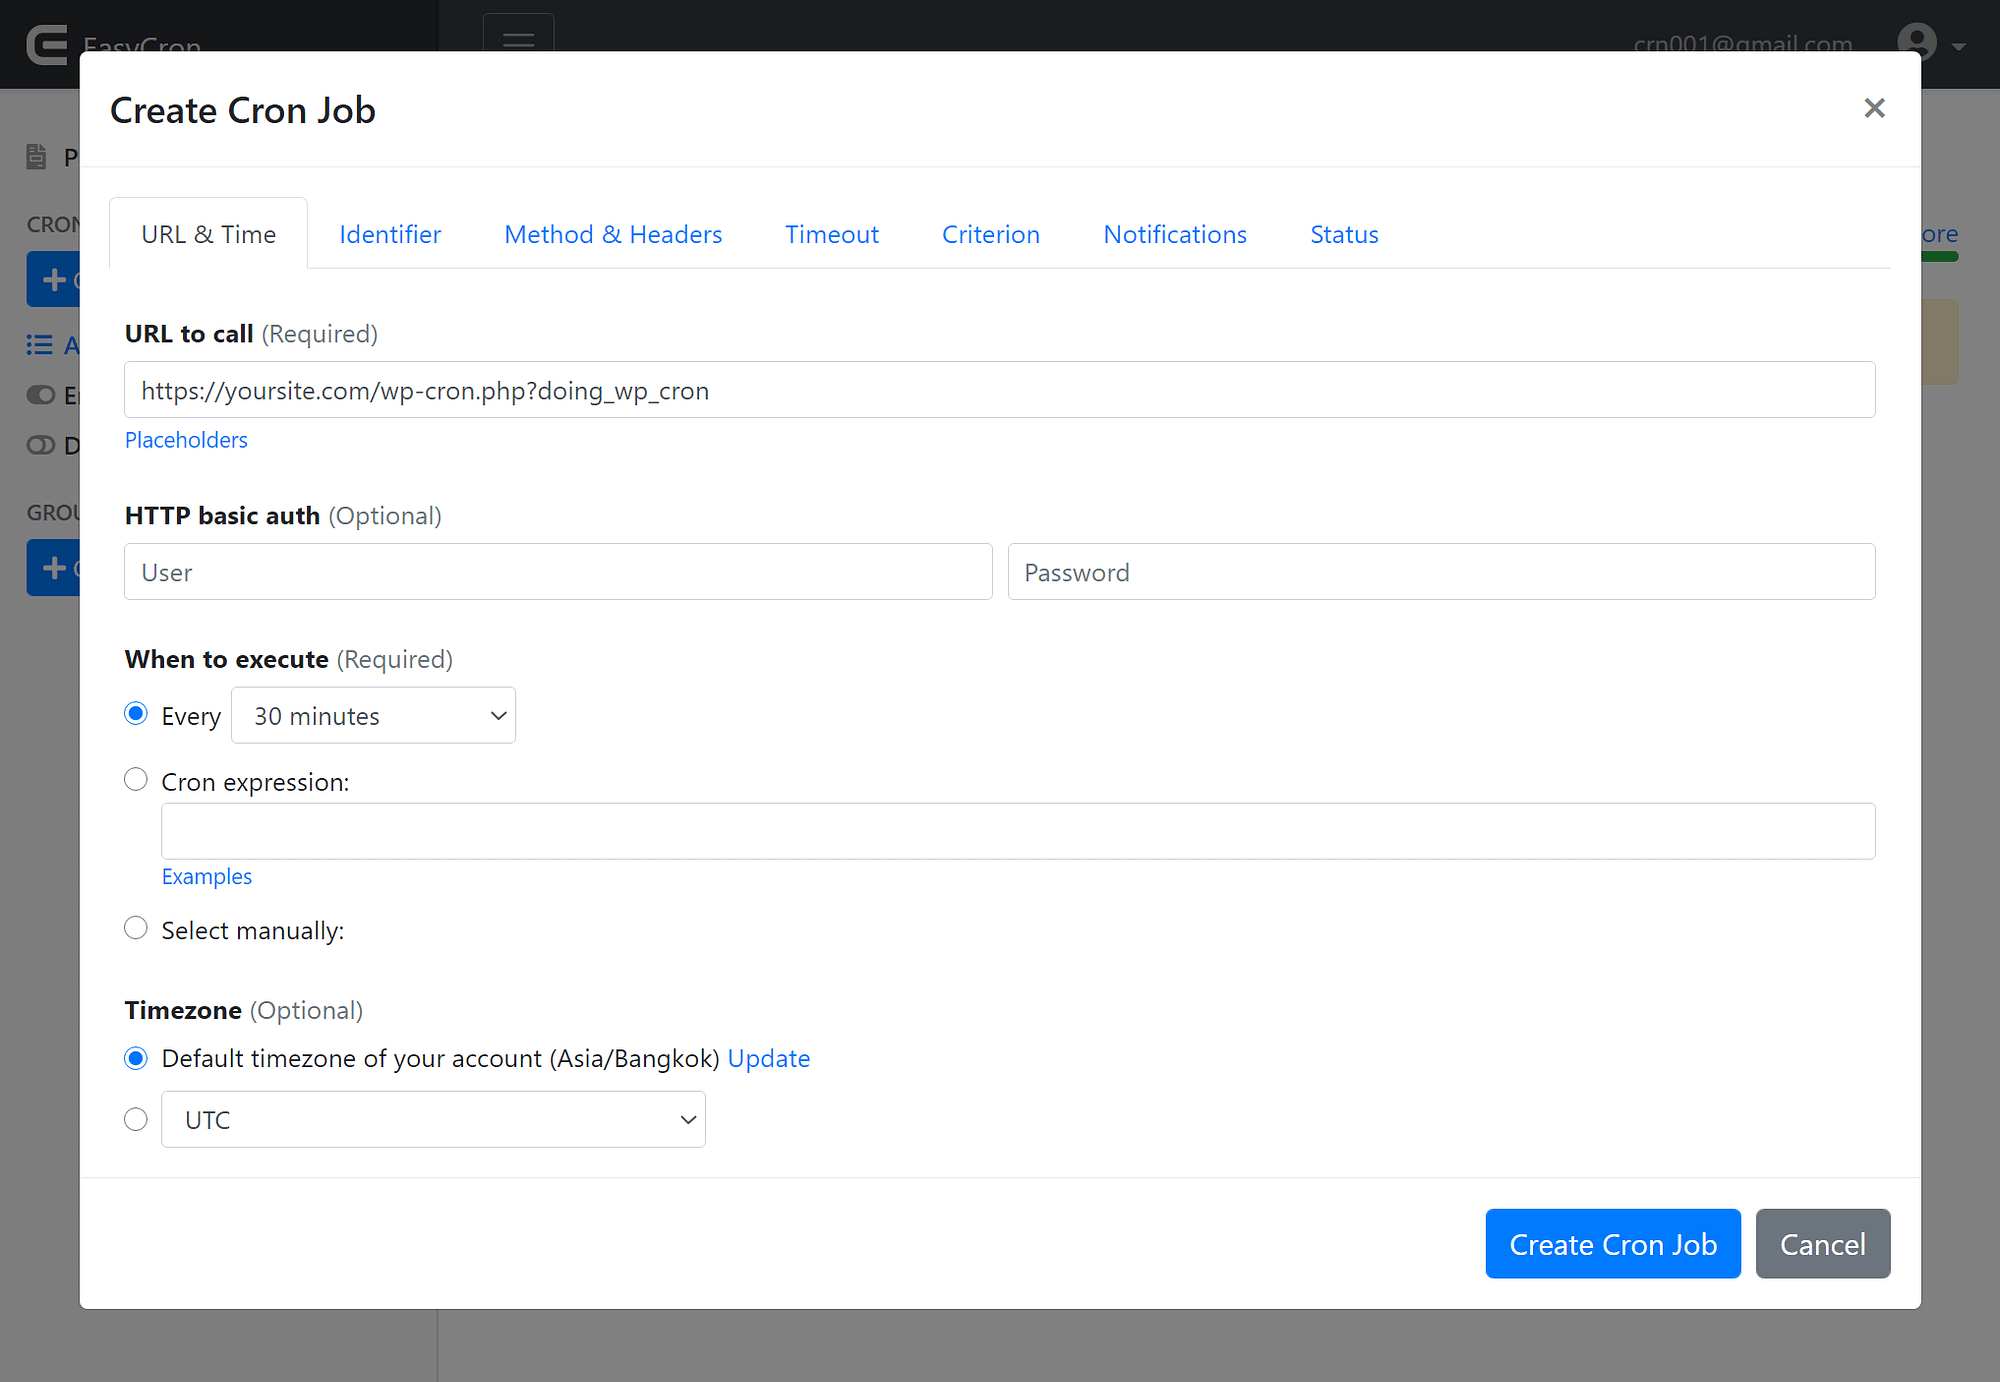
You’ll then see a popup where you can set up your cron job.
In the URL to call field, enter https://yoursite.com/wp-cron.php?doing_wp_cron, making sure to replace https://yoursite.com with your actual website URL.
Then, under When to execute, choose Every 30 minutes (you can choose more often if needed, but 30 minutes is a good starting point for most websites).
Then, click Create Cron Job to save your settings and make your cron job live:
Done!
Disable wp-cron today for more reliable task scheduling
Wp-cron is the built-in WordPress scheduling system that ensures your site’s various tasks run on time, like scheduled blog posts.
However, the built-in feature has some drawbacks when it comes to reliability (for low-traffic sites) and performance (for high-traffic sites). For those reasons, you might want to disable wp-cron and replace it with a true cron job, which is what we’ve shown you in this post.
For some other ways to improve your site’s performance, check out our full guide to improving WordPress performance.
Do you still have any questions about how to disable wp-cron and replace it with a real cron job? Let us know in the comments!